AutoSSH - The reverse tunnel for SSH
Reverse tunnel for SSH, using autossh
(Alternate title: How to access servers behind firewalls)
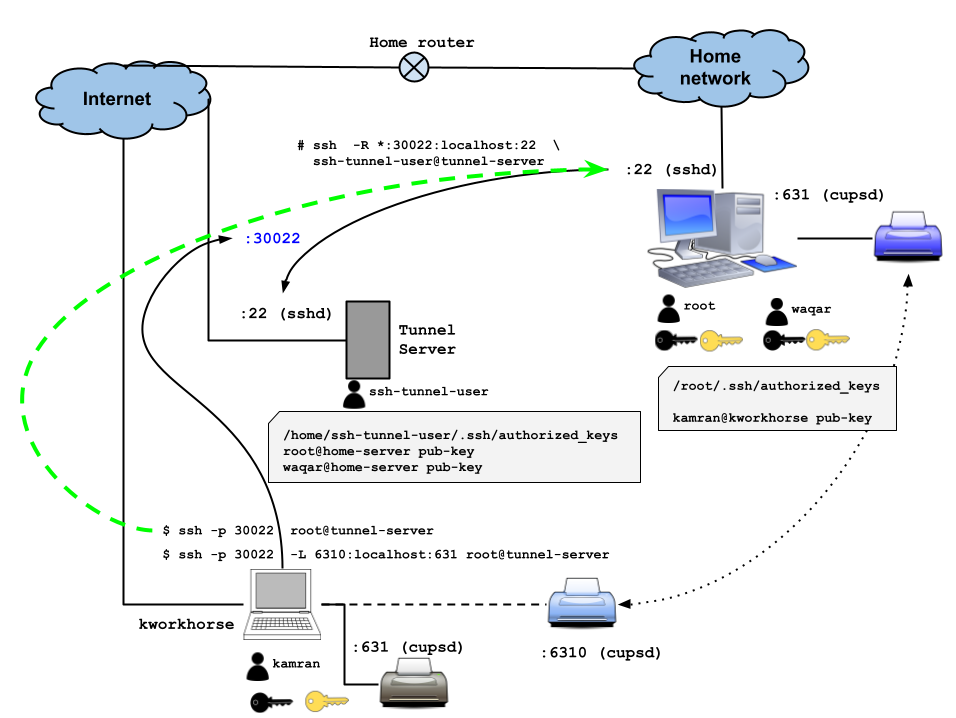
Often times we can access a remote computer over the internet by using port-forwarding on the router. This is accomplished by forwarding / DNAT a port say 22, or 80 or 443 from the router to the server inside that network. Usually this is done for computers and servers running inside a home network. What if the router does not have port forwarding options? What if the internet service provider does not allow traffic to come to the public interface of their router, even if the router has port-forwarding / DNAT options available? In such a case, you would need to use a reverse SSH tunnel. This article helps understand and setup such a tunnel.
Scenario:
Suppose we want to access a home computer (media-pc) from outside the internet without setting up port-forwarding on the router.
Step 1: Generate a SSH key-pair on the (home) computer you want to access from outside:
Create this key-pair without a passphrase, for user root on the media-PC, so the SSH session can be setup unattended.
[root@media-pc ~]# ssh-keygen -t ed25519
Generating public/private ed25519 key pair.
Enter file in which to save the key (/root/.ssh/id_ed25519):
Enter passphrase (empty for no passphrase):
Enter same passphrase again:
Your identification has been saved in /root/.ssh/id_ed25519
Your public key has been saved in /root/.ssh/id_ed25519.pub
The key fingerprint is:
SHA256:fvQ6JWGMMC+4qm7GspJ3bBCYhZ/tnAfO9NduPhuFf4g root@media-pc.home.wbitt.com
The key's randomart image is:
+--[ED25519 256]--+
| .               |
|. .   o          |
| = o . + o       |
|o + = . o +.     |
|   B = .Soo..    |
|  . B o...o=..   |
|.. + . ...Eo+ .  |
|++o +    .=o .   |
|O= o     o++     |
+----[SHA256]-----+
[root@media-pc ~]# cat /root/.ssh/id_ed25519.pub
ssh-ed25519 AAAAC3NzaC1lZDI1NTE5AAAAIMJnAXnHsjJNEv4dkwNgWcl+DCZZ7dN1od5X5G7FzK8G root@media-pc.home.wbitt.com
[root@media-pc ~]#
Step 2: Copy public part of this SSH key to the tunnel server:
A tunnel server (or, tunnel-facilitator / tunnel-maker) is the one on the internet, which you will use as a facilitator to eventually connect to the media-PC behind the home firewall.
You need to copy the public part of the SSH key of the root user from the media-PC to /home/ssh-tunnel-user/.ssh/authorized_keys file on the tunnel server. The tunnel server should be a simple server/computer on the internet with the sole purpose of setting up SSH tunnels. It should be permanent/dedicated. So you should not use one of your production servers for this task. Instead you should have a completely separate server. The tunnel server used in this document is server1.do.wbitt.com .
If this (tunnel) server is not under your control, then send the public key to the administrator of the tunnel-server, so the public key can be added to the ssh-tunnel-user’s authorized_keys file.
[ssh-tunnel-user@server1.do.wbitt.com ~]$ vi .ssh/authorized_keys

ssh-ed25519 AAAAC3NzaC1lZDI1NTE5AAAAIMJnAXnHsjJNEv4dkwNgWcl+DCZZ7dN1od5X5G7FzK8G root@media-pc.home.wbitt.com
Step 3: Verify that you can connect to the tunnel server from the media-pc:
[root@media-pc ~]# ssh  ssh-tunnel-user@server1.do.wbitt.com
Last login: Thu Jan 26 12:36:11 2023 from 84.215.13.63
[ssh-tunnel-user@server1-digitalocean ~]$ logout
Step 4: Forward a port (e.g 30022) from media-PC all the way “to” remote tunnel server:
You will need to adjust the port number for each home PC you want to access from outside. In this document, we are using 30022 to be forwarded from tunnel-server to the home-PC. However, when you have more, you will need to keep a record of what servers are configured with which (forwarded) port numbers.
For example, you can change the port 30022 to 30001 for a different computer.
[root@media-pc ~]# ssh  -R 30022:localhost:22  ssh-tunnel-user@server1.do.wbitt.com
Last login: Thu Jan 26 12:36:11 2023 from 84.215.13.63
[ssh-tunnel-user@server1-digitalocean ~]$
From this point onward you have two paths to reach this home computer from the internet using the tunnel server.
- If the tunnel server only allows port
22on it’s firewall, and other ports are not allowed, then you need to “bring” the port30022from the tunnel server to your local computer using SSH connection initiated from your work computer, and then use another SSH connection to connect tolocalhoston port30022on your work computer. - If the tunnel server allows a range of ports on it’s firewall, such as
30000 - 32000, then you can use single SSH connection to connect to port30022on the tunnel server, which will eventually (behind the scenes) connect you to the media-PC / home-server behind a home firewall.
I prefer you follow the second path described above, and make your life easy. For completion’s sake, I will show the steps you need to do if you are using the first path.
Method #1: Without opening range of ports on tunnel server:
[kamran@kworkhorse ~]$ ssh -L 30022:localhost:30022 root@server1.do.wbitt.com
Last login: Thu Jan 26 12:34:07 2023 from 84.215.13.63
[root@server1-digitalocean ~]#
Open a separate text terminal on your work computer, and use the following command.
[kamran@kworkhorse ~]$ ssh -p 30022 root@localhost
The authenticity of host '[localhost]:30022 ([127.0.0.1]:30022)' can't be established.
ED25519 key fingerprint is SHA256:MOm1vN37wq/Y4o2JBtS+ceQTtXjHlAOWFP6jasLCylM.
This host key is known by the following other names/addresses:
    ~/.ssh/known_hosts:643: 192.168.0.10
    ~/.ssh/known_hosts:663: home.wbitt.com
Are you sure you want to continue connecting (yes/no/[fingerprint])? yes
Warning: Permanently added '[localhost]:30022' (ED25519) to the list of known hosts.
Last login: Thu Jan 26 13:30:43 2023 from 192.168.0.52
[root@media-pc ~]#
As you can see, I am now logged on the the home computer (media-pc) behind the home firewall.
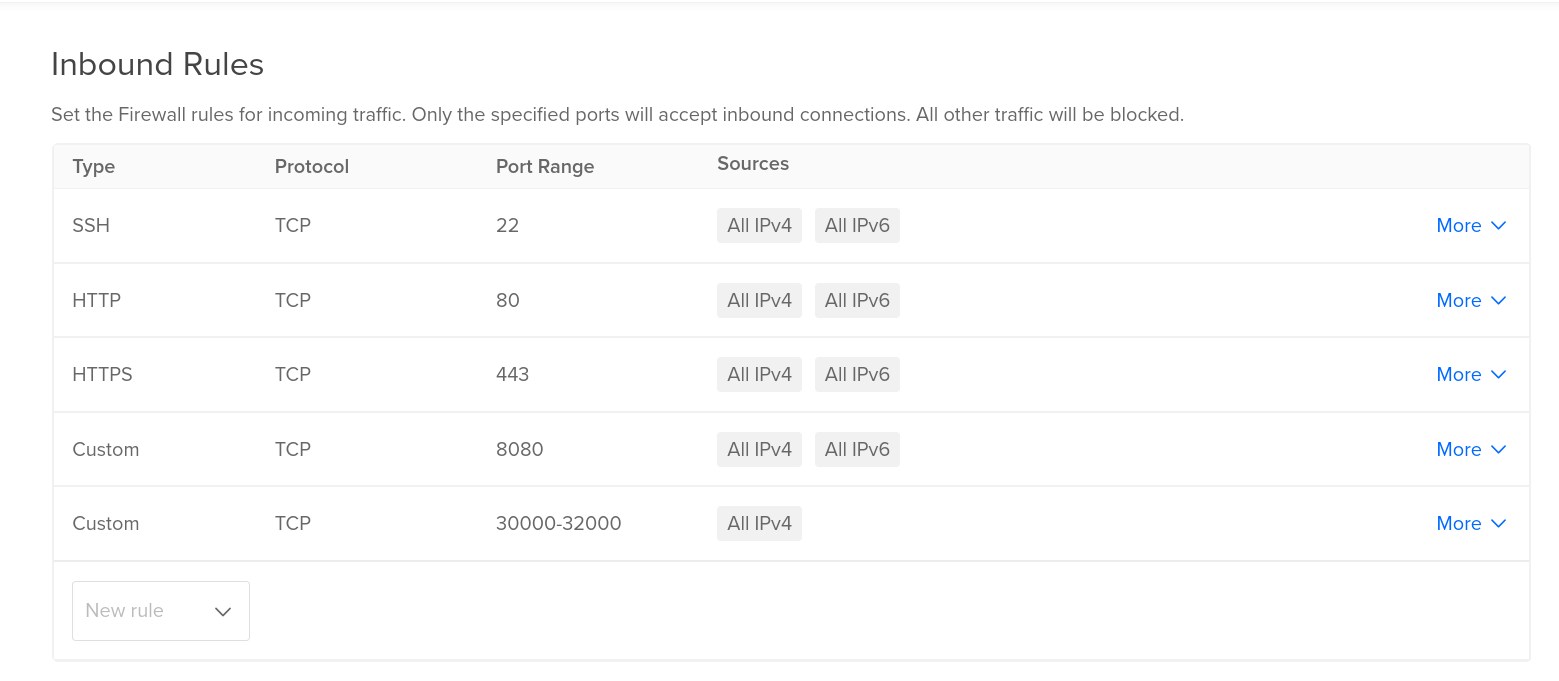
Method #2: Opening range of ports on tunnel server:
Add range of ports to the firewall’s allow-list as shown below.
On the tunnel server, enable the configuration GatewayPorts yes in the /etc/ssh/sshd_config file, and restart the SSH server for the changes to take effect.
[root@server1-digitalocean ~]# vi /etc/ssh/sshd_config
. . .
GatewayPorts yes
. . .
[root@server1-digitalocean ~]# systemctl restart sshd
Now, initiate the SSH connection from the home-server to the tunnel server again.
[root@media-pc ~]# ssh  -R *:30022:127.0.0.1:22  ssh-tunnel-user@server1.do.wbitt.com
Last login: Thu Jan 26 18:18:10 2023 from 84.215.13.63
Verify that the port is visible on the tunnel server.
[ssh-tunnel-user@server1-digitalocean ~]$ ss -ntlp
State          Recv-Q          Send-Q                   Local Address:Port                    Peer Address:Port         Process
LISTEN         0               128                            0.0.0.0:30022                        0.0.0.0:*
LISTEN         0               4096                           0.0.0.0:5355                         0.0.0.0:*
LISTEN         0               4096                           0.0.0.0:80                           0.0.0.0:*
LISTEN         0               4096                     127.0.0.53%lo:53                           0.0.0.0:*
LISTEN         0               128                            0.0.0.0:22                           0.0.0.0:*
LISTEN         0               4096                           0.0.0.0:443                          0.0.0.0:*
LISTEN         0               128                               [::]:30022                           [::]:*
LISTEN         0               4096                              [::]:5355                            [::]:*
LISTEN         0               4096                              [::]:80                              [::]:*
LISTEN         0               128                               [::]:22                              [::]:*
LISTEN         0               4096                              [::]:443                             [::]:*
[ssh-tunnel-user@server1-digitalocean ~]$
Notice that the port 30022 now shows up as 0.0.0.0:30022 instead of 127.0.0.1:30022 under the LISTEN column.
Lets try connecting to the tunnel server from the internet, i.e. from my work computer.
[kamran@kworkhorse ~]$ ssh -p 30022 root@server1.do.wbitt.com
Last login: Thu Jan 26 19:02:47 2023 from 192.168.0.52
[root@media-pc ~]#
As you can see, I am now able to login to my media-pc from my work computer. Now I can do whatever I planned to do on the media-pc.
You can use a different user to connect to media-PC when using the SSH command above. This user needs to exist on the media-PC, and not on the tunnel-server. (TODO: needs to be confirmed. There seems to be a problem with this approach. Seems like the user used to start the tunnel from media-PC is the only user that can be used to connect from the work computer from the internet.)
If you want to access to any GUI application, from your home-PC, simply add -X to the SSH command:
[kamran@kworkhorse ~]$ ssh -p 30022 -X root@server1.do.wbitt.com
Last login: Thu Jan 26 19:54:47 2023 from 192.168.0.52
/usr/bin/xauth:  file /root/.Xauthority does not exist
Run xclock as an example, and you will see xclock from the media-pc showing up on your local/work computer.
[root@media-pc ~]# xclock
Warning: Missing charsets in String to FontSet conversion
[root@media-pc ~]#
Setup AutoSSH
In the section above, we have successfully tested our setup manually. Now, we need to automate it with autossh, so the tunnel can remain up unattended.
First, we install autossh:
yum -y install autossh
Now, create a systemd service file for autossh, with the configuration of tunnel mentioned/used above.
[root@media-pc ~]# vi /etc/systemd/system/autossh-tunnel.service

[Unit]
Description=AutoSSH tunnel to setup reverse tunnel
After=network.target

[Service]

Environment="AUTOSSH_GATETIME=0"

ExecStart=/usr/bin/autossh -M 20022 -q -N -o "ServerAliveInterval 30" -o "ServerAliveCountMax 3" -R *:30022:127.0.0.1:22  ssh-tunnel-user@server1.do.wbitt.com

[Install]
WantedBy=multi-user.target
Explanation:
AutoSSH service expects a monitoring port over which it keeps sending keep-alive checks/packets. This port is normally something different from the port you are using for your main communication. For this example, I use the port 20022 which is different from 30022 . As you can also see, autossh has some of it’s own parameters and switches, and takes whatever parameters you want to use from the standard SSH command.
Therefore:
/usr/bin/autossh -M 20022is the main autossh command. Here20022is a port which will be opened up on the remote/tunnel-server, and a port20022+1, i.e.20023will be opened up on the media-PC. This will be used to exchange keepalive messages. The port20022does not need to be opened up in the firewall of the tunnel server. Nor, the port20023needs to be opened up on the firewall of the media-PC.-q -N -o "ServerAliveInterval 60" -o "ServerAliveCountMax 3"are the parameters of standard SSH command.-R *:30022:127.0.0.1:22 ssh-tunnel-user@server1.do.wbitt.comare also the parameters of standard SSH command that we are interested in passing to the autossh command, so our reverse tunnel get setup correctly.
Now, stop any reverse tunnels / ssh sessions on this media-PC, and then start the autossh-tunnel service - manually:
[root@media-pc ~]# systemctl enable autossh-tunnel

[root@media-pc ~]# systemctl restart autossh-tunnel
Check status of the service:
[root@media-pc ~]# systemctl status autossh-tunnel
● autossh-tunnel.service - AutoSSH tunnel for sending telegraf metrics to influxdb
     Loaded: loaded (/etc/systemd/system/autossh-tunnel.service; disabled; vendor preset: disabled)
     Active: active (running) since Fri 2023-01-27 09:06:58 CET; 5s ago
   Main PID: 1008817 (autossh)
      Tasks: 2 (limit: 19081)
     Memory: 1.4M
        CPU: 50ms
     CGroup: /system.slice/autossh-tunnel.service
             ├─ 1008817 /usr/bin/autossh -M 20022 -q -N -o "ServerAliveInterval 60" -o "ServerAliveCountMax 3" -R "*:30022:127.0.0.1:22>
             └─ 1008818 /usr/bin/ssh -L 20022:127.0.0.1:20022 -R 20022:127.0.0.1:20023 -q -N -o "ServerAliveInterval 60" -o "ServerAliv>

Jan 27 09:06:58 media-pc.home.wbitt.com systemd[1]: Started autossh-tunnel.service - AutoSSH tunnel for sending telegraf metrics to inf>
Jan 27 09:06:58 media-pc.home.wbitt.com autossh[1008817]: starting ssh (count 1)
Jan 27 09:06:58 media-pc.home.wbitt.com autossh[1008817]: ssh child pid is 1008818
 ESCOC
Connect to this home-PC over SSH from a computer present on the internet, such as my work computer.
[kamran@kworkhorse ~]$ ssh -p 30022 -X root@server1.do.wbitt.com
Last login: Fri Jan 27 09:07:37 2023 from 127.0.0.1
[root@media-pc ~]#
It works!
Now enable autossh service:
[root@media-pc ~]# systemctl enable autossh-tunnel
Created symlink /etc/systemd/system/multi-user.target.wants/autossh-tunnel.service → /etc/systemd/system/autossh-tunnel.service.
[root@media-pc ~]#
Appendix-A:
What happens if you don’t set GatewayPorts option for the SSH server running on the tunnel server?
Try to initiate the SSH tunnel from the home-server to the tunnel server, as shown below:
[root@media-pc ~]# ssh  -R *:30022:127.0.0.1:22  ssh-tunnel-user@server1.do.wbitt.com
Last login: Thu Jan 26 15:23:02 2023 from 84.215.13.63
If you check the ports in LISTEN state on this tunnel-server, you will see that the port 30022 that has been forwarded from the home computer to the tunnel server is only bound to the loopback interface 127.0.0.1, even though a * is specified to indicate that the port should be bound to all interfaces on that tunnel server.
[ssh-tunnel-user@server1-digitalocean ~]$ ss -ntlp
State          Recv-Q          Send-Q                   Local Address:Port                    Peer Address:Port         Process
LISTEN         0               128                          127.0.0.1:30022                        0.0.0.0:*
LISTEN         0               4096                           0.0.0.0:5355                         0.0.0.0:*
LISTEN         0               4096                           0.0.0.0:80                           0.0.0.0:*
LISTEN         0               4096                     127.0.0.53%lo:53                           0.0.0.0:*
LISTEN         0               128                            0.0.0.0:22                           0.0.0.0:*
LISTEN         0               4096                           0.0.0.0:443                          0.0.0.0:*
LISTEN         0               128                              [::1]:30022                           [::]:*
LISTEN         0               4096                              [::]:5355                            [::]:*
LISTEN         0               4096                              [::]:80                              [::]:*
LISTEN         0               128                               [::]:22                              [::]:*
LISTEN         0               4096                              [::]:443                             [::]:*
[ssh-tunnel-user@server1-digitalocean ~]$
If you try connecting to this port from outside, i.e. from your work computer, the SSH connection will fail.
[kamran@kworkhorse ~]$ ssh -p 30022 root@server1.do.wbitt.com
ssh: connect to host server1.do.wbitt.com port 30022: Connection refused
[kamran@kworkhorse ~]$
For this to work, a special configuration option (GatewayPorts) in the SSH server needs be configured, which is running on the tunnel server.
First, here is the related excerpt from man 5 sshd_config:
GatewayPorts Specifies whether remote hosts are allowed to connect to ports forwarded for the client. By default, sshd(8) binds remote port forwardings to the loopback address. This prevents other remote hosts from connecting to forwarded ports. GatewayPorts can be used to specify that sshd should allow remote port forwardings to bind to non-loopback addresses, thus allowing other hosts to connect. The argument may be “no” to force remote port forwardings to be available to the local host only, “yes” to force remote port forwardings to bind to the wildcard address, or clientspecified to allow the client to select the address to which the forwarding is bound. The default is no.
Even if you specify this as a switch from the client side, it won’t have an effect, as shown below:
[root@media-pc ~]# ssh  -R *:30022:127.0.0.1:22  -o GatewayPorts=yes ssh-tunnel-user@server1.do.wbitt.com
Last login: Thu Jan 26 18:03:12 2023 from 84.215.13.63
  session-147659.scope

[ssh-tunnel-user@server1-digitalocean ~]$ ss -ntlp
State          Recv-Q          Send-Q                   Local Address:Port                    Peer Address:Port         Process
LISTEN         0               128                          127.0.0.1:30022                        0.0.0.0:*
LISTEN         0               4096                           0.0.0.0:5355                         0.0.0.0:*
LISTEN         0               4096                           0.0.0.0:80                           0.0.0.0:*
LISTEN         0               4096                     127.0.0.53%lo:53                           0.0.0.0:*
LISTEN         0               128                            0.0.0.0:22                           0.0.0.0:*
LISTEN         0               4096                           0.0.0.0:443                          0.0.0.0:*
LISTEN         0               128                              [::1]:30022                           [::]:*
LISTEN         0               4096                              [::]:5355                            [::]:*
LISTEN         0               4096                              [::]:80                              [::]:*
LISTEN         0               128                               [::]:22                              [::]:*
LISTEN         0               4096                              [::]:443                             [::]:*
[ssh-tunnel-user@server1-digitalocean ~]$
On the tunnel server, enable GatewayPorts yes in the /etc/ssh/sshd_config file, and restart the SSH server for the changes to take effect.
[root@server1-digitalocean ~]# vi /etc/ssh/sshd_config
. . .
GatewayPorts yes
. . .
[root@server1-digitalocean ~]# systemctl restart sshd
Now, initiate the SSH connection from the home-server to the tunnel server again.
[root@media-pc ~]# ssh  -R *:30022:127.0.0.1:22  ssh-tunnel-user@server1.do.wbitt.com
Last login: Thu Jan 26 18:18:10 2023 from 84.215.13.63

[ssh-tunnel-user@server1-digitalocean ~]$ ss -ntlp
State          Recv-Q          Send-Q                   Local Address:Port                    Peer Address:Port         Process
LISTEN         0               128                            0.0.0.0:30022                        0.0.0.0:*
LISTEN         0               4096                           0.0.0.0:5355                         0.0.0.0:*
LISTEN         0               4096                           0.0.0.0:80                           0.0.0.0:*
LISTEN         0               4096                     127.0.0.53%lo:53                           0.0.0.0:*
LISTEN         0               128                            0.0.0.0:22                           0.0.0.0:*
LISTEN         0               4096                           0.0.0.0:443                          0.0.0.0:*
LISTEN         0               128                               [::]:30022                           [::]:*
LISTEN         0               4096                              [::]:5355                            [::]:*
LISTEN         0               4096                              [::]:80                              [::]:*
LISTEN         0               128                               [::]:22                              [::]:*
LISTEN         0               4096                              [::]:443                             [::]:*
[ssh-tunnel-user@server1-digitalocean ~]$
Notice that the port 30022 now shows up as 0.0.0.0:30022 instead of 127.0.0.1:30022 under the LISTEN column.
Lets try connecting to the tunnel server from the internet, i.e. from my work computer.
[kamran@kworkhorse ~]$ ssh -p 30022 root@server1.do.wbitt.com
Last login: Thu Jan 26 19:02:47 2023 from 192.168.0.52
[root@media-pc ~]#
As you can see, I am now able to login to my media-pc from my work computer. Now I can do whatever I planned to do on the media-pc.
Note: Since I wanted to reach my home-server from outside the internet, I do need the public part of my own SSH key in the .ssh/authorized_keys file of the user I want to connect as, on the media-pc. If it is user root on my home-computer/media PC, then it needs to be in /root/.ssh/authorized_keys file. If I want to connect as a different user, such as kamran on the media PC, then it needs to be inside /home/kamran/.ssh/authorized_keys file.